Sure! I can help you with a tutorial on how to use venv (Virtual Environment) in Python.
Step 1: Install Python Make sure you have Python installed on your system. You can download the latest version of Python from the official website (https://www.python.org/downloads/) and follow the installation instructions.
Step 2: Create a Virtual Environment Once Python is installed, open your terminal or command prompt and navigate to the directory where you want to create your project. Then, run the following command to create a virtual environment:
python3 -m venv myenv
This command will create a new directory called “myenv” (you can choose any name you prefer) that contains the necessary files for the virtual environment.
Step 3: Activate the Virtual Environment After creating the virtual environment, you need to activate it. The command to activate the virtual environment depends on your operating system:
For Windows:
myenv\Scripts\activate.bat
For macOS/Linux:
source myenv/bin/activate
Once activated, you will notice that your terminal prompt changes to indicate that you are now working within the virtual environment.
Step 4: Install Packages Now that you are inside the virtual environment, you can use pip to install any packages or dependencies specific to your project. For example, to install the requests library, you can run the following command:
pip install requests
You can install as many packages as you need for your project.
Step 5: Run Your Python Code With the virtual environment activated and the required packages installed, you can now run your Python code within the environment. You can execute your Python scripts as you would normally do:
python your_script.py
Step 6: Deactivate the Virtual Environment Once you have finished working on your project, you can deactivate the virtual environment by running the following command:
deactivate
This will return you to your regular system environment.
That’s it! You have successfully used venv to create a virtual environment and manage your Python project’s dependencies. Using virtual environments helps keep your project’s dependencies isolated and prevents conflicts between different projects.
Remember to activate the virtual environment every time you work on your project to ensure you are using the correct Python interpreter and package versions specific to that project.
You can register and download Utimaco HSM Simulator here My setup Environment using ubuntu desktop 20.04, virtual box Version 6.1.36 r152435 You just need to copy the bin file, But this is how if you find it is not working
./cs_sim.sh: line 3: /home/user/Software/Linux/Simulator/sim5_linux/bin/bl_sim5: No such file or directory
according ask ubuntu, this is similar to the executable file cannot run in your current architecture
Menambahkan hardisk pada ubuntu di virtual box (sumber)
Langkah langkah menambahkan hardisk pada Virtual Box
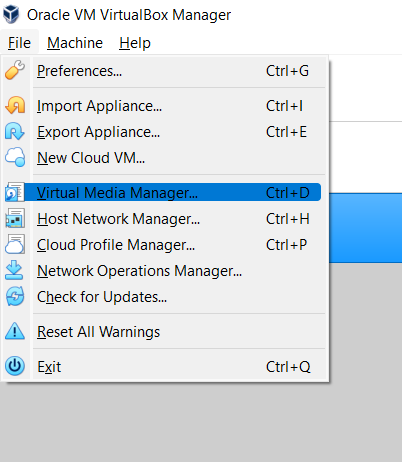
Tambahkan ukuran VDI di virtual box ( File, Virtual Media Manager )
Pilih .vdi yang digunakan dalam server, dan sesuaikan ukuran yang akan digunakan
klik Apply, Restart
Melakukan Resize Volume pada VM ubuntu Server
Alokasikan freespace yang baru ditambahkan menggunakan command : sudo cfdisk , pilih freespace, [new] , lalu [write], restart server (vm)
Lalu, gunakan command : sudo fdisk -l /dev/sda untuk melihat alokasi baru yang telah kita buat sebelumnya (pada contoh ini, partisi baru adalah /dev/sda4
Kemdian, format alokasi (mis. sda4) ini , sebelumnya periksa physical volume (PV) dengan command : sudopvdisplay,
kemudian lakukan format PV dengan command : sudo pvcreate /dev/sda4
Untuk melihat hasilnya gunakan kembali sudo pvdisplay
Selanjutnya extend Virtual Group (VG) , pada kasus ini VG saya bernama ubuntu-vg
Gunakan command sudo vgextend ubuntu-vg /dev/sda4
Kemudian Periksa Logical Volume (LV) dengan command : sudo lvdisplay, catat LV Path
Extend LV dengan command : sudo lvextend -l+100%FREE /dev/ubuntu-vg/ubuntu-lv
Terakhir adalah kita remapping filesystem, sebelumnya cek direktori yang akan di mapping, menggunakan command : df -h, pada kasus saya direktori root / ada pada filesystem /dev/mapper/ubuntu--vg-ubuntu--lv
Sehingga, untuk melakukan remapping, menggunakan command : sudo resize2fs /dev/mapper/ubuntu--vg-ubuntu--lv, cek hasil akhir menggunakan df -h
public void populateForm(ComponentSystemEvent event) {
    HtmlForm form = (HtmlForm) event.getComponent();
    for (Field field : fields) {
        switch (field.getType()) { // It's easiest if it's an enum.
            case TEXT:
                UIInput input = new HtmlInputText();
                input.setId(field.getName()); // Must be unique!
                input.setValueExpression("value", createValueExpression("#{bean.values['" + field.getName() + "']}", String.class));
                form.getChildren().add(input);
                break;
            case SECRET:
                UIInput input = new HtmlInputSecret();
                // etc...
        }
    }
}
(note: do NOT create the HtmlForm yourself! use the JSF-created one, this one is never null)
This guarantees that the tree is populated at exactly the right moment, and keeps getters free of business logic, and avoids potential “duplicate component ID” trouble when #{bean} is in a broader scope than the request scope (so you can safely use e.g. a view scoped bean here), and keeps the bean free of UIComponent properties which in turn avoids potential serialization trouble and memory leaking when the component is held as a property of a serializable bean.
If you’re still on JSF 1.x where <f:event> is not available, instead bind the form component to a request (not session!) scoped bean via binding
<h:form id="form" binding="#{bean.form}" />
And then lazily populate it in the getter of the form:
public HtmlForm getForm() {
    if (form == null) {
        form = new HtmlForm();
        // ... (continue with code as above)
    }
    return form;
}
Proxy Server adalah server yang diletakkan antara suatu aplikasi client dan aplikasi server yang dihubungi. Aplikasi client dapat berupa browser web, client FTP, dan sebagainya. Sedangkan aplikasi server dapat berupa server web, server FTP dan sebagainya.
Proxy Server yang diletakkan di antara aplikasi client dan aplikasi server tersebut, dapat digunakan untuk mengendalikan maupun memonitor lalu-lintas paket data yang melewatinya (Wagito, 2007). Read the rest of this entry »
Jadi ketika kita membuat sebaris comment pada barisan kode dalam halaman html pada project jsf, akan ikut terproses dan terkadang akan menimbuklan error, bahkan tak jarang dia akan menganggapnya sebagai bagian dari component, sehingga ada dua cara untuk membuat baris komentar kita tidak ikut terproses saat pembuatan halaman jsf tadi yaitu : Read the rest of this entry »
Jadi, Maven itu semacam platform project yang mana bisa di buka dan di kembangkan dengan berbagai IDE.
Semisal kita membuat sebuah aplikasi dengan IDE Eclipse, tapi kemudian mau di bantu temen kita, tapi dia punyanya setup IDE NetBean. Nah jika dari awal kita membuat aplikasi itu dengan konsep MAVEN project, nanti source code nya langsung bisa di buka gitu aja di NetBean, tapa setting macam – macam..
Kalau masih bingung, ini nih, source nya dari sinau dewe sekalian ada pdf nya.
Sebenarnya ini hanya sebuah tips bagi yang kebetulan berhadapan dengan kondisi dimana diharuskan mengembangkan sebuah aplikasi komputer, dimana prasayarat yang dibutukan adalah sperti dapat digunakan (compatible) dengan MSSQL, MySQL serta Oracle sekaligus. Atau misalnya jika mengembangkan aplikasi berbasis Java, dapat dijalankan dari server WebSphere, GlassFish, ApacheTomcat dan sebagainya.
Ini berdasarkan pengalaman penulis sendiri, dan mungkin apabila ada dari pembaca yang budiman memiliki saran yang lebih baik, mohon dengan senang hati bisa memberikan saran 🙂 Jadi saat itu yang dikembangkan adalah sebuah aplikasi JavaEE yang bisa berjalan dengan berbagai macam database dan dijalankan dengan server GlashFish maupun IBM WebSphere
Server Websphere [oracle ; MSSQL ; MySQL]
Menggunakan virtualisasi adalah langkah yang lumayan memudahkan dengan infrastruktur sebagai berikut
HOST (di instal berbagai jenis DB Engine)
VM1 (Workspace untuk Environment WebSphere) [1 ~ 2GB RAM]
VM2 (Workspace untuk Environment GlashFish) [1 ~ 2GB RAM]
dengan demikian akan meringankan pembagian beban kerja antara masing masing project, mengingat oracle membutuhkan service yang cukup besar, sehingga jika ada kasus [GF (GlashFish) – Oracle ] atau [WebSphere – Oracle] tidak perlu menginstall oracle sebanyak dua kali