Menambahkan hardisk pada ubuntu di virtual box (sumber)
Langkah langkah menambahkan hardisk pada Virtual Box
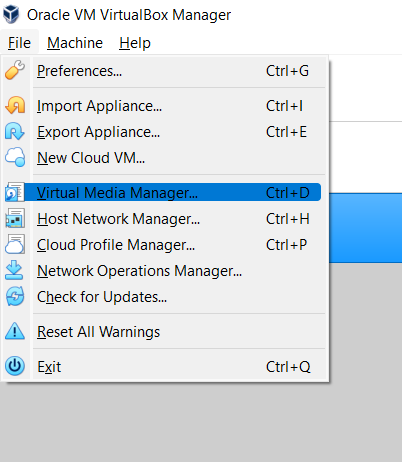
Tambahkan ukuran VDI di virtual box ( File, Virtual Media Manager )
Pilih .vdi yang digunakan dalam server, dan sesuaikan ukuran yang akan digunakan
klik Apply, Restart
Melakukan Resize Volume pada VM ubuntu Server
Alokasikan freespace yang baru ditambahkan menggunakan command : sudo cfdisk , pilih freespace, [new] , lalu [write], restart server (vm)
Lalu, gunakan command : sudo fdisk -l /dev/sda untuk melihat alokasi baru yang telah kita buat sebelumnya (pada contoh ini, partisi baru adalah /dev/sda4
Kemdian, format alokasi (mis. sda4) ini , sebelumnya periksa physical volume (PV) dengan command : sudopvdisplay,
kemudian lakukan format PV dengan command : sudo pvcreate /dev/sda4
Untuk melihat hasilnya gunakan kembali sudo pvdisplay
Selanjutnya extend Virtual Group (VG) , pada kasus ini VG saya bernama ubuntu-vg
Gunakan command sudo vgextend ubuntu-vg /dev/sda4
Kemudian Periksa Logical Volume (LV) dengan command : sudo lvdisplay, catat LV Path
Extend LV dengan command : sudo lvextend -l+100%FREE /dev/ubuntu-vg/ubuntu-lv
Terakhir adalah kita remapping filesystem, sebelumnya cek direktori yang akan di mapping, menggunakan command : df -h, pada kasus saya direktori root / ada pada filesystem /dev/mapper/ubuntu--vg-ubuntu--lv
Sehingga, untuk melakukan remapping, menggunakan command : sudo resize2fs /dev/mapper/ubuntu--vg-ubuntu--lv, cek hasil akhir menggunakan df -h
Berawal dari menggunakan type data BigDecimal untuk keperluan perhitungan uang (currency) dimana dibutuhkan slot untuk numerik (angka) yang cukup panjang, termasuk dua angka di belakang koma.
Object obj = 0.01;
BigDecimal one = new BigDecimal((Double)obj);
BigDecimal two = new BigDecimal(0.01);
BigDecimal three = new BigDecimal("0.01");
BigDecimal four = two.setScale(3, RoundingMode.HALF_EVEN);

System.out.println(one);
System.out.println(two);
System.out.println(three);
System.out.println(four);
Pada barisan Code di atas, untuk tipe data BigDecimal akan menghasilkan nilai yang berbeda
SystemOut     O 0.01000000000000000020816681711721685132943093776702880859375
SystemOut     O 0.01000000000000000020816681711721685132943093776702880859375
SystemOut     O 0.01
SystemOut     O 0.010
Dengan demikian, agar bisa di terima oleh parameter Stored Procedure, perlu di potong, dengan pembulatan, walaupun sebenarnya 2(dua) angka dibelakang koma sudah cukup, namun dalam hal ini, saya mengantisipasi adanya pembulatan menggunakan
RoundingMode.HALF_EVEN
Sekian, Terimakasih
_GoodProgram Show What is wrong, not just throw it to exceptions 🙂
Perhatian : TL-WA5110G /TL-WA5210G hanya support sistem keamanan WEP dengan mode Repeater/Universal Repeater.
Information of Root Router:
LAN IP: 192.168.1.1
SSID: TP-LINK-test
Encryption Type: WEP Open Hexadecimal
Passphrase: 0123456789
Persiapan
Karena fungsi DHCP pada TL-WA5110G /TL-WA5210G secara default adalah mati(disabled), maka kita perlu melakukan setting IP secara manual. Setting IP : 192.168.1.x pada komputer untuk bisa terhubung dengan IP default (192.168.1.254) milik AP.
Contoh:
kemudian hubungkan AP dengan komputer menggunakan kabel Ethernet.
Configuration on Device (TL-WA5110G / TL-WA5210G):
1.Login to the Repeater’s management page.
Click Operation Mode, selectAPmode and click Save.
In the address bar of the web browser, type in the IP address of the repeater (default is 192.168.1.254) and press Enter.
Type in the Username and Password (default is admin).
2. Click Operation Mode, selectAPmode and click Save.
3. Click Wireless -> Wireless Mode. Select Universal Repeater as the Wireless Mode. Then click Survey.(If the Root Router supports WDS, you can select Repeater as Wireless Mode.)
4. Find the Root Router’s SSID on the AP List, and then click Connect.
5. Click Save.
If you can see the following picture, please wait until it refreshes back to the Status page.
6. Do the same Wireless Security Settings as your Root Router.
At Repeater/Universal Repeater mode, TL-WA5110G /TL-WA5210G can only support WEP as security type. And if your Root Router´s wireless network is secured, please make sure that the security type is WEP.
In our example, the Root Router is WEP secured.
Click Wireless ->Security settings.
Select WEP, and set the same Type, Key Format and Key Type as the Root Router.
Then put in the same password “0123456789”.
Click Save.
7. Click System Tools->Reboot->Reboot to restart the device.
After you go through all the above steps, the Repeater should be working properly with the Root Router.
NOTE:
After you finish the settings, please change the Local Area Connection IP address setting for your computer back to the default.